i got this rocking chair from my aunt(by marriage) after emily was born. since she was an only child, she gave me her blessing to use it for our kids. aaaand, i could do anything i wanted to it!! well...4 years later...

fabric(i think i used less than 1 1/2 yards...this is child size though...so if you're looking to do this for an adult sized chair, you'll need more fabric)
sewing machine
coordinating thread
pins
scissors
pencil(NOT a permanent marker...i'll explain more later)
paper to create a template(i used a piece of tissue paper...'cause its what was handy @ the time!)
spray paint color of your choice-2 cans
sand paper
primer
iron/ironing board
rotary cutter/mat
1 inch think foam
serrated knife or utility knife
*start by sanding the chair...i hate sanding, but it must be done. just do it enough to take the shine off of the finish.
*spray on 1-2- coats of primer, allow to completely dry.
*spray with your color(mine was blue ocean breeze-gloss, by krylon) at least 2 coats

*after paint is fully dry, use your paper and PENCIL to create a template. i liked using the tissue paper because i was able to smooth it out into all of the curves...however...do not, i repeat...do not use a permanent marker to trace your out line...you will have to spray another coat of paint :o/


*pin onto fabric(wrong side up), and cut out(this will be the top of the cushion)

*pin on again, this time, you'll want to add 4 inches to the height...i suggest going ahead and making another pattern piece for this...it will make your life easier, and you won't waste fabric--trust me!(this will end up being the bottom pieces of the cushion)
*cut this piece in half...i made the top piece a little larger(this will be pillow sham style)

*next, cut out 12 13x 1 3/4 strips(for the ties)
***i will stop you right here...DO NOT cut out these pieces...I BEG OF YOU, just go out and buy some RIBBON for the ties! unless, that is, you like standing hunched over your ironing board for a long period of time to make these by hand. you like being hunched over your ironing board? ...ok, then i guess i'll show you how to finish them....(i'm telling you, go for the ribbon...i woke up with a migraine the next morning!!)


....see, that was annoying!!
*edge stitch along top folded edge and all the way down the open side(i left the bottom open, its getting sewn later)
*take bottom pieces of cushion and fold 1/2 inch, press and again to create a hem...edge stitch

*make your fabric sandwich:
take top piece, and lay down right side up, set 2 ties in each corner, then layer with the 2 bottom pieces wrong side up


*repeat for your second cushion
*cut out foam using serrated knife or utility knife using the original line on pattern; insert into covers
*bonus pillow:
i had extra fabric that was the perfect size for a little throw pillow. sew around all of the edges(wrong sides together), leaving a 2-3 inch opening. snip corners, turn right side out. stuff with batting. fold opening in 1/4 inch, sew closed.

BIG FINISH:
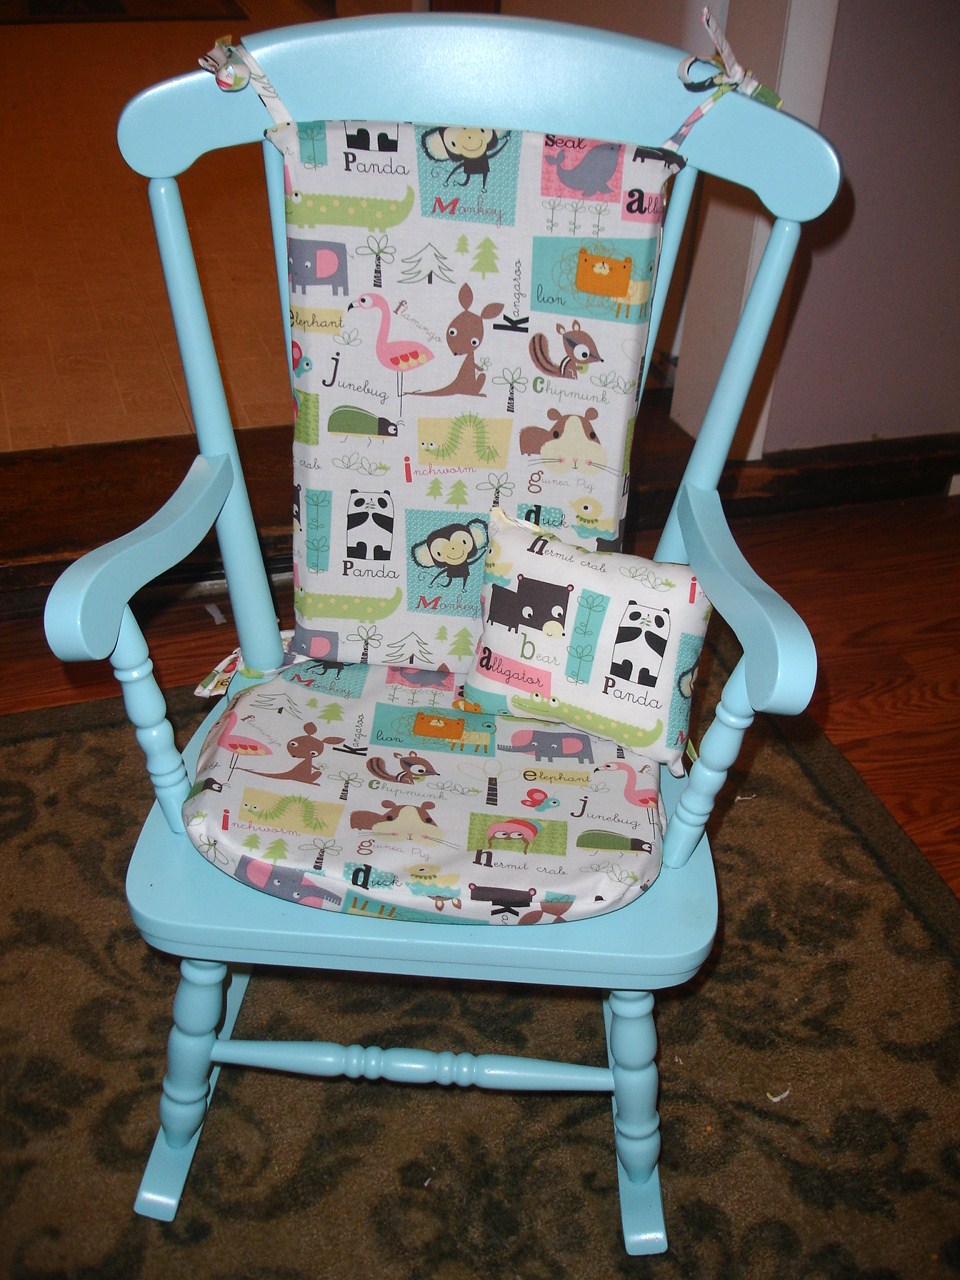


That is absolutely adorable!!! You made it so much cuter than it was, charming!!!
ReplyDeleteI love the spray paint, and I'm glad we get to learn from your mistakes with the marker thing...yikes! :)
ReplyDeleteHun you rock! I love the spray paint idea and the cushions are really awesome!
ReplyDeleteSo cute! Thanks for sharing.
ReplyDeleteThe fabric you chose is really cute, and like nothing I've ever seen. Love it!
ReplyDeleteThanks for sharing!
Love the paint and fabric choices...this was definitely worth the wait and I'm sure it will be put to good use. Well done!
ReplyDeleteWhat a precious project! I LOVE the color and the fabric. Great job!! I'm visiting from The CSI Project. :)
ReplyDeleteVery cute! Love the color and fabric. Very colorful. =) I came across this on the CSI project.
ReplyDeleteLove it! Great choice of paint and fabric. So much more appropriate for a child's chair!
ReplyDeleteLooks awesome! Thanks for stopping by & commenting on my painted 'granite' countertops! :)
ReplyDeleteWhat a fantastic make over!
ReplyDeleteWhat a cute makeover. I love that blue on the chair! Thanks for linking it up to the CSI Project!
ReplyDeleteXOXO
Jen
Oh my, I have that same rocker. I never thought about doing something this great with it! Thanks for the great idea!
ReplyDelete